Manage Customer Info and Settings in One Place

How do I edit a vehicle’s service interval?
Customize a vehicle’s service interval for regular maintenance
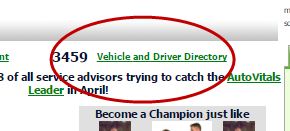
- Navigate to the Vehicle and Driver Directory from the AutoVitals Dashboard
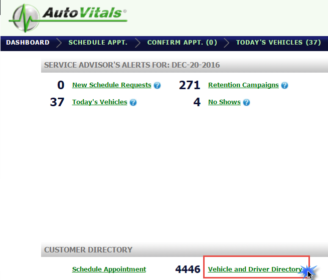
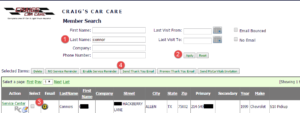
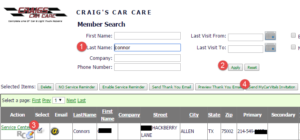
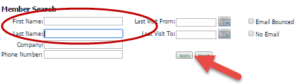
2. Enter the motorist’s last name or company name, then hit Apply. Once you have found the customer, click on Service Center.

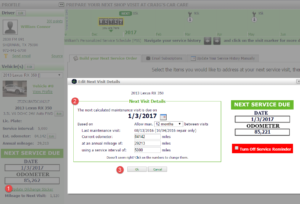
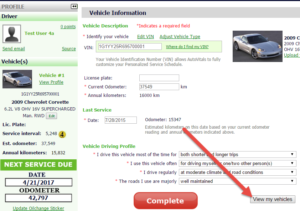
3. Click on ‘Update Oil Change Sticker’ on the bottom left of the Service Center. This will open a pop-up where you can edit the:
- Due date of next recommended visit (calculated based on their service interval and annual mileage)
- Current odometer (this is the estimated odometer that AutoVitals calculates the motorist is currently at, based on their annual mileage)
- Annual Mileage. For all new customers, this is by default the national average of 13,000 miles. At each next visit, the Annual Mileage is recalculated based on the odometer at their last visit and the odometer at the most recent visit.
- Service Interval. This determines when the vehicle comes due for Regular Maintenance (oil changes) and subsequently when they will be sent service reminder emails and postcards (if applicable).
This will change the service interval for this 1 individual vehicle. If you would like to change the default service interval for all vehicles in your shop, or for all vehicles of a certain make and odometer, contact your Product Adviser for guidance.
Customer Communication Icons
Communication Icons
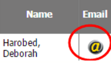
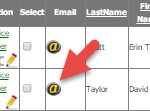
In the Email column, you have a customer communication icon that shows the available avenues of communication with that customer. To edit a customer’s email and text message settings, simply click on the icon. This will pop up a screen where you can enter or edit an email, manage their customer account, as well as enroll customers for text messages.
![]()
You will notice that different customers have different icons under the email column. Each signifies the customer’s communication settings.
![]() A blank yellow circle means no emails or text messages.
A blank yellow circle means no emails or text messages.
 Any yellow @ sign means the account has not been activated. A solid yellow @ sign means the account invitation email has been sent.
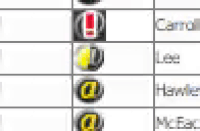 If the yellow @ sign is spinning, the account invitation has not been sent.
![]() The solid grey @ sign means the account setup has been completed.
The solid grey @ sign means the account setup has been completed.
![]() A red “X” through a Blank Yellow Circle means the customer has been marked for “No Marketing”.
A red “X” through a Blank Yellow Circle means the customer has been marked for “No Marketing”.
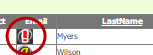 A red exclamation point over an @ sign means an email sent to this address did not go through.
![]() The T icon means the customer also has Text Messages set up.
The T icon means the customer also has Text Messages set up.
How do I edit a customer’s text message settings?
To subscribe or unsubscribe a motorist from text message communication:
First click on Vehicle and Driver Directory from the AutoVitals Dashboard

Then, enter the motorist’s last name or company name, then hit Apply. Click on the circular communication icon under the column called Email

Once you click on the communication icon, you will see a pop-up. To register a motorist for text messages, click the box called Sign up for Text Message.
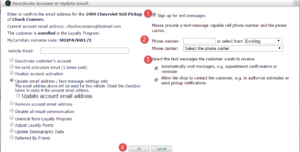
To unsubscribe a motorist from getting text messages:
Once you have clicked on the circular email communication icon from the Vehicle and Driver Directory for the motorist (shown above how to navigate here), you will see the same pop-up as when subscribing a motorist to texts.
First, check Change Text Message Settings. Then, uncheck the boxes called Automatically send text messages, and Allow the shop to contact the customer. Finally, hit OK! This will prevent the motorist from getting text messages from your shop.
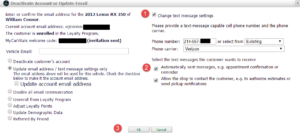
How do I edit a customer’s email settings?
To edit any email information, first, navigate to the Vehicle and Driver Directory
Then search by motorist’s last name or company name and click on the circular communication icon in the Email column.
To add a second email to the vehicle’s account:
This is used for situations where two emails need notifications about this 1 vehicle. Commonly this is used for spouses, parents/children, or companies.
Since there is already an email on the account, enter the second email in the Vehicle Email box. Then hit OK. This will add the “vehicle email”. So now the vehicle has an Account email address, which applies to any other vehicles owned by the motorist, as well as a Vehicle Email, which only applies to this 1 vehicle on the account.
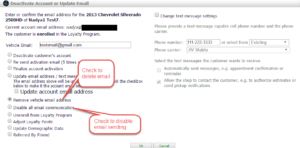
To add or edit the account email address:
It is recommended to edit or enter an email address in your POS instead of AutoVitals because AutoVitals will pick up the change so you only have to do it once. However, if for any reason you wanted to do it directly in AutoVitals, just enter the email in the Vehicle Email box, check Update account email address, and hit OK.
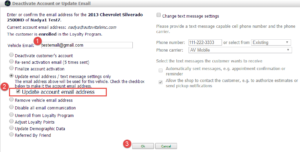
To delete the email, or disable sending emails to this motorist:
Again it is recommended to delete the email or disable marketing in your POS so it only has to be done once*.
- To delete an email from AutoVitals, just check the box called Remove vehicle email address.
- To prevent the customer from getting email marketing, check the Disable all email communication box.
*Detection of a deleted email address is NOT supported for Tire Power/TCS.
How do I tell if a thank you email was sent?
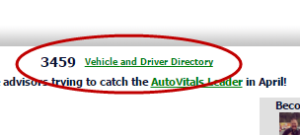
To see if a Thank You email was sent, click on the Vehicle and Driver Directory.
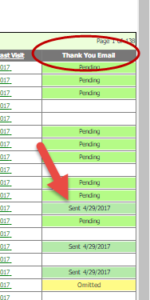
You can search for the customer you would like to check by typing their last name into the Member Search box and clicking “Apply”.

On the far right side of the screen is a column labeled “Thank You Email”. Here, you will find the status and send date of the customer’s Thank You email.
How do I delete a vehicle from AutoVitals?
To delete a vehicle from AutoVitals, it is recommended you do this in your POS because then AutoVitals will pick up the change and you will not have to delete it twice*.
*Detection of a deleted vehicle is NOT supported for Winworks or Mitchell1. You will have to delete it in your POS and in AutoVitals if using Winworks or Mitchell1.
First click on Vehicle and Driver Directory from the AutoVitals Dashboard

Then click search by motorist’s last name or company name, and hit Apply. Click Service Center next to the motorist’s name.
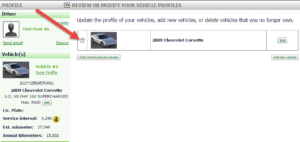
Click Edit Next to Vehicle(s)

Then click View my Vehicles
Click the Trash icon next to the Vehicle you wish to delete.
How do I resend a Thank you email?
To send or resend a Thank you Email:
- From the Vehicle and Driver Directory, search by motorist’s last name or company name, and hit Apply.
- Then click the Select box next to the motorist’s name.
- Press the Send Thank you Email button
How do I resend a Service Center activation email?
The Activation email is sent after the visit to invite the motorist to set up their online Service Center account and also mentions the mobile app MyCarVitals.
To send the Account Activation email:
Navigate to the Vehicle and Driver Directory
Then search by motorist’s last name or company name and click on the circular communication icon in the Email column.
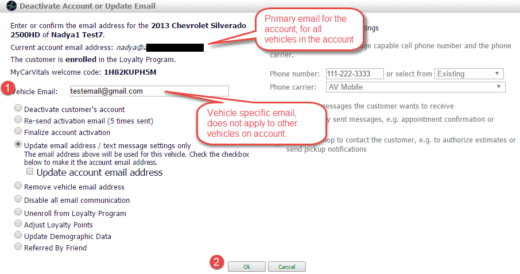
If the customer has not been sent the activation email l before, click on Activate Account. If they have been sent it before, click on Resend Activation email. You will not be able to do either of these options if the customer already has their account active.
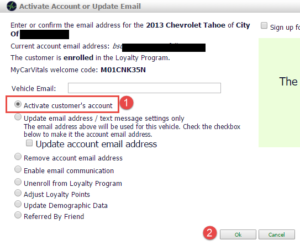
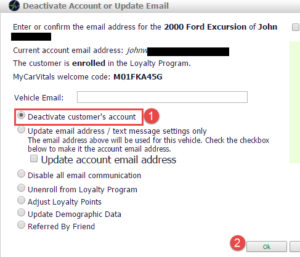
To deactivate a customer’s account:
Simply click the Deactivate customer’s account. This option will only show if the customer has an active account already.
How do I help a motorist get the MyCarVials app?
You can find the motorist’s welcome code needed to log into MyCarVitals or resend them the email with the code from the Vehicle and Driver Directory as well.
To find the welcome code for MyCarVitals:
Click on the email communication icon in the Vehicle and Driver Directory next to the customer’s name. If your shop has MyCarVitals enabled, you will see a welcome code. If you do not see this, contact your Product Adviser about getting MyCarVitals turned on.
To send the motorist an invitation to download the app with their welcome code included, hit the Select box next to their name in the Vehicle and Driver directory. Then press the button called Send MyCarVitals Invitation.
How do I unenroll a customer from the loyalty points programs?
If a customer no longer wishes to receive loyalty points, you can enroll them through your Vehicle and Driver Directory.
First, click on your Vehicle and Driver Directory to view a list of your customers.
Next, search for the customer you would like to enroll by searching their last name in the “Member Search” bar and clicking “Apply”. Their information will appear in the list below the search bar.
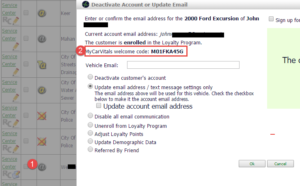
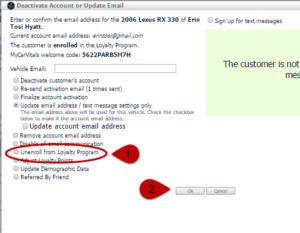
Click on the @ sign of the customer you would like to unenroll.
A “Deactivate Account or Update Email” box will pop up. Check the “Unenroll from Loyalty Program” box and then click “OK”.
The Vehicle and Driver Directory allows you to quickly find out the status and settings for any motorist and vehicle in 1 place. This allows you and your staff to easily help your customers adjust their settings and communicate with your shop in the way that best fits their needs.
Use the Vehicle and Driver directory to quickly see a motorist’s settings and edit them here. Since you can easily look up everything from the service interval to the customer’s email communication settings, managing how and when your customers get communicated with is best done from the Vehicle and Driver directory.
For changes to customer information that is available in your POS, you may want to directly make those changes in the POS because AutoVitals will detect those changes and display them in AutoVitals. This includes changes like customer name, deleting or editing email, addresses, etc. Updates to motorist/vehicle info in AutoVitals will not transfer to your POS when entered in the Vehicle and Driver directory.