
Quick Start Guide for iPad users
Quick Start Guide for iPad users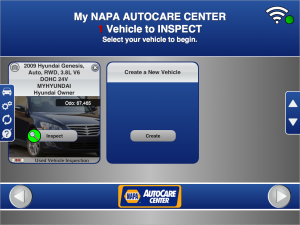 We would like to thank you for choosing NAPA DVI for digital inspections at your shop. We know you will find it to be a remarkable tool, and we want to make sure you are completely successful.
Below you will find detailed steps to: Turn on and Configure your new iPad, Download and Install the DVI app, and Launch / Login to the DVI application.
Note: The screenshots may look a little different on your iPad depending on the version of IOS installed.
Setup your new iPad
Your new iPad comes un-configured so that you can customize it for you shop’s specific use. The following steps show you have to turn it on and configure the device. There are images of the screens that will appear at each step. Click on any image to show it larger. You will need to know the name and password for your wireless network. You will also be asked to sign in with an Apple ID or iTunes account. You should create a new one to be used for your shop and do not use your personal iTunes .
Power on the Device
To begin you’ll have to turn on the device. To turn it on, push and hold the power button at the top right corner of the screen. If it does not go on right away hold the button until you see the Apple Logo. When you see the home screen follow the directions at the bottom of the screen and slide to the right to begin.
In the rare case that the iPad is not responding, you can reset the device by using the following process.
- Press and hold the Power button and the HOME button in the bottom middle of the screen at the same time until the Apple logo appears (10-12 seconds).
- Release both buttons and wait for the home screen to appear

Swipe to Begin
Swipe to Begin
Enter your language of choice

Select a language
Select your country

Select your country
Choose a Wifi Network
You will be promoted to select the WiFi network. You should see the wireless network name for your shop. You will need the password too.

Choose your Wifi Network

Enter your WiFi Password
Location Services
You can enable Location Services so that in case you misplace your iPad you can find it with Find My iPad or lock it remotely.
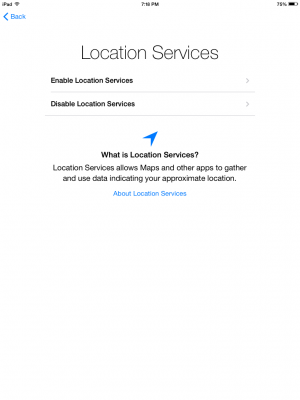
Use Location Services
Set Up iPad
You will want to setup this iPad as a new device. The option to restore device from the cloud would be used if you were recovering your previous data on an iPad that is being reset.
You will also be asked to enter an Apple ID. If you have not already created an Apple ID for your shop select Create a Free Apple ID. This is going to be used for updating the device when needed and to download Apps from the App Store. Also you probably do not want to use a personal Apple ID since devices sharing a single Apple ID will share photos apps and iTunes music. Continue following the pictures below to complete setting up your iPad.
Setup as a New Ipad

Setup as a New Ipad
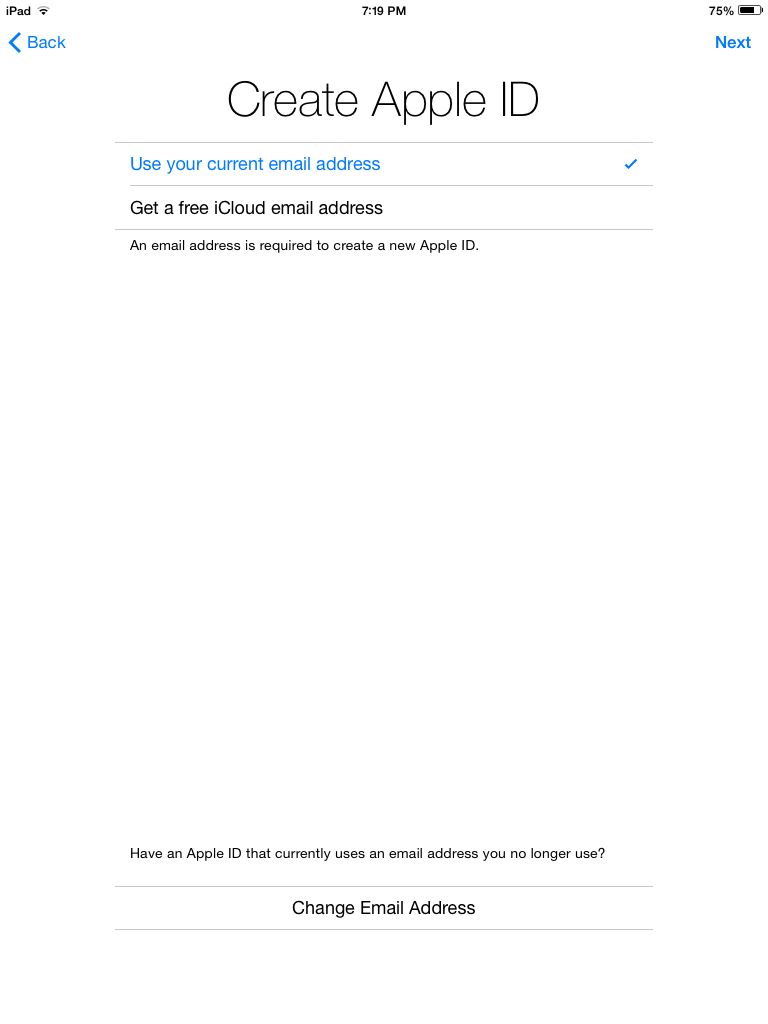
Create a New Apple ID

Create Apple ID with an existing email address
Enter a Birthday > 17 yrs

Enter a Birthday older that 18 yrs
Assign a Name to your iPad

Give your iPad a name.
Enter your Email Address

Enter your email address to create your apple ID.
Create an Apple ID Password

Create and apple ID password.
Security Qs in case your forget your Password

Answer three security questions provided in case you ever forget your password.
Rescue Email – Lost Password

Enter Email for Lost Password
Don’t Get Email Updates

You don’t want email updates from Apple
Agree to Ts and Cs

Agree to the terms and conditions to continue.
Dont’ Use iCloud

Do not use iCloud.
Don’t Add a Passcode

Adding a passcode will require multiple people to know it which can be a nuisance in the workplace.
Setup Siri for Voice to Text

Use Siri.
Get Started with DVI

Now that you’ve completed setting up your iPad, you can set up DVI.
Download NAPA DVI from the Apple AppStore
Now that you have completed setting up your iPad, the next step is to download the Digital Vehicle Inspection application from the app store located on the home screen of your iPad. It is a capital letter A with a white circle surrounding it. To search for DVI, type in “NAPA DVI” and it should be the first result. Press “get” and it will either prompt you to type in your Apple ID password, or immediately start downloading. Once it is finished, it will be located on the home screen of your iPad. Go ahead and press it and follow the detailed instructions below on how to set up your account on DVI, as well as understand how to use the inspection sheets provided. To enlarge the pictures shown below simply click them.
Setting up DVI
1. Once you’ve downloaded the NAPA DVI application from the application store, you will see this screen. On this screen you will be prompted to type in your name, shop name, phone number, email address, and your location code. If you do not know what your location code is, simply type in “tryout.” After completing all those steps, click send me my credential.

The first page you’ll see when you open the DVI application.
Signing into DVI
2. After clicking send me my credentials, you should shortly receive an email that looks like the top screen providing you with your password. Return back to the DVI application and use your email and password to log yourself in where it says, ‘I have received the email, here is my username and password.”

Email message from AutoVitals.
DVI application home page.
First Inspection
3. Now that you are finally logged in, you can go ahead and proceed with your first inspection. Click create, and you will be directed to the screen labeled “New Vehicle” shown in the middle of this section.

Vehicle inspection sheet.
dgfljhsfgkjsklgj;sfkd;lskf;lsdkfd;lfk
You must provide the vehicle’s information before you begin the inspection. You may manually enter it in.
New vehicle form.
lsgjslfjsdklfj
You also have the option of pressing scan and scanning the VIN number instead of manually entering it.

Scanning the VIN
Using the Inspection Sheets
4. Congratulations! You are now performing your first inspection using the DVI application. You will have different types of inspection sheets offered to you depending on the part of the vehicle you are working on. Below we can see that the technician was working on the road test for the vehicle. If the technician finds no problems, you simply tap the name of the area you were inspecting and a check mark will appear noting that all is well in that area. If you find something wrong, you will need to look under thew column titled “In Car.” Prior to you selecting anything, it will say “Select Condition.” You can press that to look at the options listed and choose what is wrong with that part of the vehicle. After completing your inspection, you can press submit located at the top right hand corner of the screen.

Inspection sheet.
Completing the Inspection
5. Once you’ve pressed submit, it will ask you to confirm whether or not you want to submit the inspection which will in turn remove it from the tablet. If you realize you’ve missed something go ahead and press cancel. Otherwise, press ok. Now your service advisor will have access to the inspection sheet and be able to give it to the customer. You have now completed your first inspection.

Confirm whether or not you want to remove sheet from tablet.
- V5.0.12 Topic and Photo/Image/Notes Editor - April 9, 2019
- Changing your PoS Server Guidelines - February 28, 2018
- Lost Customer Email Campaign - October 2, 2017